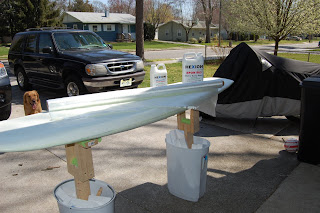
 Stands:
I definitely think these are a must! They make it so easy to work on your board. even waxing my old board is easier! I had planned on using buckets of sand as the bases, but I had these two trash cans just sitting around. I didn't have time to run out and get some sand so I just stuffed the extra foam from shaping in there to hold the wood still. As it turns out that was better since they are lighter to move. Shaping went very well. I used a Scroll saw to cut the outline. Then I angled the rails using the same saw. I wanted to leave the board as thick as possible so I didn't plane it down to get the curve on the front right. I sanded the front and back to create a good start on the rocker. Before I put the first coat of glass on I pressed a screw in each end of the board and hung bags of rocks on them. This flexed the board enought to give me the rocker I needed. Talk about scary I was afraid I was going to hear the board snap but it worked great! I just added one rock at a time.
 This is the Epoxy resin I used. I cut two layers of 6 ounce E cloth and coated the bottom of the board. I had to use the Epoxy since the foam is made of polyester. Polyurathane resin would have melted it. Once it cured I took off the bags of rocks and it looked great. A little bit of wrinkles but not enough to complain about.
  I coated the top with two coats of cloth. I was so excited to see the progress that I forgot the other two layers of deck patch. AHHH! Oh well. Thats where I am in these pictures, about to do the two additional deck patch layers. That worked out ok I was able to put Serial number on and have it under some cloth for protection. You can see the circle I drew for the leash plug as well.
 Here you can see the angle needed for the deck patch. They say if you don't do this the board will break right across that line.
I decided to purchase a fin rather than make one. It was only 12 dollars and looks alot better than what I think I would have made. Also while shopping for the fin, I found that leash plugs were only $1.00 so I am definitely doing that too :)
When I was installing the finbox and the leash plug I learned that it is definitely better to use five minute epoxy rather than the epoxy resin. It took 20 minutes for the resin to set up and boy do those things move a lot!
So here is where I am. I only have one more layer of Epoxy resin on each side and then I am done! I am still trying to decide on doing art or not! If I am going to do it now is the time. I have a strong urge to do something but it looks good just white. A bad paint job would make it look well . . . bad!
To be continued . . .
To be continued . . .


