Friday, June 27, 2008

Finally Done!


Ok so I decided to wing it and try some color. I came up with Green and Yellow. I was thinking of more electric green but this was all the hardware store had :( I think it came out ok all in all.
I pulled out my old airbrush and had some fun. After I finished blending the yellow and green, I thought it needed something more so I outlined the whole thing with a little black. The shine here is only temporary. I was just finishing the gloss coat of epoxy. It looks so good when it is wet. After it dries it looks a little dull. I read about guys that spend tons of time trying to get that shine, but then just cover it with wax anyway. That can't be me I don't have enough patience.

So all done. "Board Number One" wow it was both harder and not as hard as I expected. I was surprised by the way some things went. I expected shaping to be harder than it was. The rails came out rougher than I expected. I cant tell if thats because the shaping wasnt right or the glassing. The next time I shape a board I will definitely try some different things. I would spend more time with a block and sandpaper rather than power tools.

Its funny six months ago if I saw this board I would be like wow thats great I want to make one just like it. Now that its done I wish I had done this better or that better. I really have to get over it and just enjoy the time I had building it. I really did enjoy it!

I do have to say wow a surfboard all in all done for under $150! I can't wait to get this stick out and see if I can catch a wave with it. So here it is all leashed up, waxed up and waiting for the first ride.

Tuesday, May 20, 2008

Pictures :)

Stands:

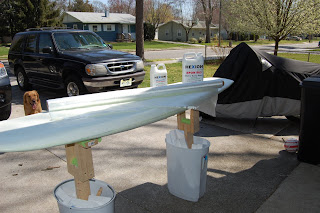
I definitely think these are a must! They make it so easy to work on your board. even waxing my old board is easier! I had planned on using buckets of sand as the bases, but I had these two trash cans just sitting around. I didn't have time to run out and get some sand so I just stuffed the extra foam from shaping in there to hold the wood still. As it turns out that was better since they are lighter to move. Shaping went very well. I used a Scroll saw to cut the outline. Then I angled the rails using the same saw. I wanted to leave the board as thick as possible so I didn't plane it down to get the curve on the front right. I sanded the front and back to create a good start on the rocker. Before I put the first coat of glass on I pressed a screw in each end of the board and hung bags of rocks on them. This flexed the board enought to give me the rocker I needed. Talk about scary I was afraid I was going to hear the board snap but it worked great! I just added one rock at a time.
This is the Epoxy resin I used. I cut two layers of 6 ounce E cloth and coated the bottom of the board. I had to use the Epoxy since the foam is made of polyester. Polyurathane resin would have melted it. Once it cured I took off the bags of rocks and it looked great. A little bit of wrinkles but not enough to complain about.


I coated the top with two coats of cloth. I was so excited to see the progress that I forgot the other two layers of deck patch. AHHH! Oh well. Thats where I am in these pictures, about to do the two additional deck patch layers. That worked out ok I was able to put Serial number on and have it under some cloth for protection. You can see the circle I drew for the leash plug as well.


Here you can see the angle needed for the deck patch. They say if you don't do this the board will break right across that line.


I decided to purchase a fin rather than make one. It was only 12 dollars and looks alot better than what I think I would have made. Also while shopping for the fin, I found that leash plugs were only $1.00 so I am definitely doing that too :)

When I was installing the finbox and the leash plug I learned that it is definitely better to use five minute epoxy rather than the epoxy resin. It took 20 minutes for the resin to set up and boy do those things move a lot!


So here is where I am. I only have one more layer of Epoxy resin on each side and then I am done! I am still trying to decide on doing art or not! If I am going to do it now is the time. I have a strong urge to do something but it looks good just white. A bad paint job would make it look well . . . bad!

To be continued . . .


Friday, April 11, 2008

I Wish I had taken pictures!

Well I'm half way through my first home made surfboard! I didn't know I was going to do this blog so I didn't bother taking any pictures up till now.

I just bring you up to speed on what I have done so far.

So first of all I tried to go simple and just find a board to buy. Boy its hard to find big boards cheap. I have an old gun that I use to ride when I was in High School, but now I'm huh hum "bigger". Hence the name FAT DADDY. So the cheapest option I found was like $400.00 and then you had to add shipping to that !!! Wow thats a big investment for me anyway. So I started my quest, can a board be built for $100?

I started off by doing alot of reading and research! There are alot of people that build boards! Its actually alot easier than I thought it might be, but yet still difficult, if that makes any sense.

Most valuable info is on this site (some of the links for buying supplies are old though)
"How to Build Your First Surfboard"

So the question my wife always wants to know. Can it be done for the $100. The short answer .... No. The good news I'm not too far over budget at all :) So far I'm at about $125 and shouldn't go over $150 out the door.

I started searching for the foam core. There are tons of places that you can order from online. however they are usually around $150 plus Shipping $100. That takes a big chunk of the budget. So I ruled that out.

Plan Two - I went looking at Home Depot and Lowes. Home depot has the blue board that you see people using all over the net. The problem was that it was only 3/4" thick so I would have to make quite a thick sandwich. Lowes however had a White 2" thick polystyrene 4'x8' sheet for $24. I was so excited I just bought right there. I hadn't discussed it with Kim (my wife) yet that I was actually going to do this so I was nervous to bring it home. But IT was there and I was excited and wow a Foam Blank for $24 holy cow!

Lowes White Insulation

I also in the heat of the moment bought foam caulk / glue. That turned out to be not so good. I wish I had used the great stuff foam It would have made shaping easier.

So I stuffed my big foam sheet in the car and ran home, cut it in half and glued it together! Kim was a little disappointed when I came in all covered in white stuff, since I didn't tell her first. I do have to say she handled it quite well. I think that she realized how much it meant to me and didn't want to spoil my excitement.

I took the time to build the stands that Steve recommends, I highly agree with him they are a must!!!


Sunday, April 6, 2008

Hello world

I will be posting pictures of my homemade surfboards.